An Updated Scolling Image Bar jQuery Carousel
Update: This project has been updated yet again, check out this post: Open Source jQuery Carousel
Awhile back I posted a jQuery carousel type project that I wrote, eloquently called Scrolling Image Bar. I went back and rewrote a bunch of it, making it more solid, usable, and featured, so I thought I would make another post about it to talk about the changes and how to use it.
github: github.com/justinmc/jQuery-Open-Carousel
demo: justinmccandless.com/demos/jQuery-Open-Carousel/index.html
Most proudly, the project is now a bit more robust. Instead of requiring a set width of each frame to be specified beforehand, width is determined in javascript, and frames of varying width are ok. Selectors have been made more universal and renamed to something a bit more intuitive, so just add my classes into your content and it will work with what you already have. I apologize for my original name choice, but you also don’t have to only use images as frames, a div full of html content works just as well.
Config options can now be passed as data parameters in html, so you don’t need to edit the javascript file if you want to scroll at a different frequency for example. You can even have multiple instances of this running on the same site with different settings, without interference.
Lastly, to break my original name in yet another way, I added another animation option. Instead of scrolling, passing a data-imagebar-transition=“fade” will fade to the next frame instead of scrolling. Be sure you have a nice looking background behind it, as it fades to transparent.
Those are the main ideas of this update, overall it should be a lot more usable now! Usage and configuration instructions follow, taken from the README.
How to set it up
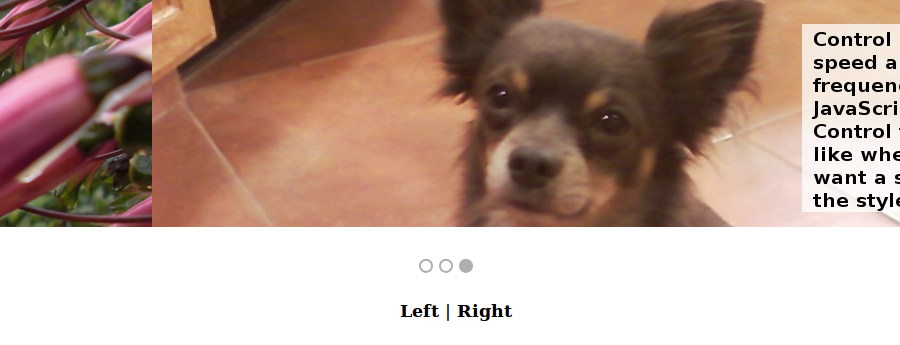
This project consists of the carousel itself, an svg indicator
to help with navigation, and left/right buttons. The last two
are optional, so let’s start with setting up the basic carousel
by itself. Be sure to check out the live demo (link at the top)
to see all of this in action.
The Carousel
The carousel itself is just your content, a container div, and a
window div. The window div has the class “imagebar_window”, and
any content below it is visible while other content is hidden.
The two important CSS properties here are white-space: nowrap;
and overflow: hidden;. Other than that, just set this up where
you want your carousel content to appear.
The container div has the class “imagebar_window_slides”, and it
needs to contain all of your content horizontally from left to
right. Give it the CSS property white-space: nowrap; as well,
and be sure to set the width to accomodate all of your content
without wrapping.
Each “slide” that will appear in the carousel should have the
class “imagebar_window_slide” and the id “imagebar_window_slide[n]”
where [n] should be replaced with the number slide, starting
from zero. These can be any block-level object, such as a div
or an img. You might want to use float: left; on each of these
in order to keep them positioned right next to eachother.


Indicators
As mentioned, indicator circles can also be used to show
which slide is currently active and its position among
the total number of slides. Just set a class of
“imagebar_indicators_circle” and an id of
“imagebar_indicators_circle[n]“, where [n] is the number
of the indicator starting from zero. I used a simple SVG
indicator with an id of “imagebar_indicators” on the svg
object, though thumbnails or any other clickable object
could also be used to scroll to a specific slide.
Forward/Back Buttons
Lastly, to provide forward/back buttons, just add the
class “imagebar_button_left” or “imagebar_button_right”
to any clickable object and it will transition in
whichever direction you click. It will correctly wrap
back around to the start/finish if you go too far.
Left |
Right
Configuration
You can change the default transition speed, transition
frequency, and/or animation type by passing a simple
data attribute in the imagebar_window_slides div.
data-imagebar-speed = the duration of the transition, milliseconds
data-imagebar-frequency = the time between each transition, milliseconds
data-imagebar-animation = "fade" will give a fading transition, othwerise scrolling is used